
 Growing up, summer time meant spending time on Balboa Island. Some summers, we would rent a house. Sometimes with another family, yet most summer’s we just rented our own home. We participated in many daily activities; fishing in the bay, riding around the island in a small motor boat, and riding our bikes until the moon was our only light source.
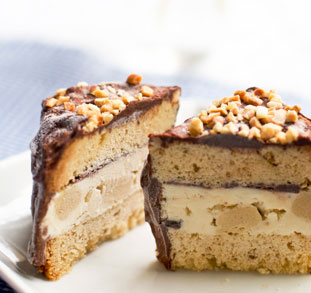
The most important daily activity was eating a “bal bar”. A bal bar is basically a brick of ice cream with a stick in it. Then it is dipped in the most amazing chocolate sauce and covered in either nuts or jimmies. I always went for the nuts (see original ice cream here).
This dessert reminds me of my childhood. For me, it’s all about the nuts. The original bal bar didn’t have cake in it. However, topping this dessert off with roasted, salted peanuts brought back some darn good memories!
Brown Butter Pound Cake
yield 1 – 8 1/2 x 4 1/2″ loaf
Adapted from here
Ingredients:
2 1/4 (9 oz.) sticks unsalted butter
2 cups sifted cake flour (before measuring)
1 teaspoon baking powder
1/2 teaspoon salt
1/2 cup packed light brown sugar
1/2 cup white sugar
4 large eggs
1/2 teaspoon vanilla extract
Instructions:
Preheat oven to 325°F. Butter and flour an 8 1/2 x 4 1/2″ loaf pan. Heat butter in a 10″ skillet over medium heat until milk solids on bottom are dark chocolate brown (don’t walk away, it burns super fast). Transfer to a shallow bowl and chill in freezer until congealed, 15 minutes. Whisk flour, baking powder, and salt.
In a mixer, beat sugars and brown butter until fluffy (the smell at this point is intoxicating). Add eggs, one at a time. Add vanilla. Mix in flour mixture until just incorporated. Transfer to prepared pan. Bake until golden brown and a wooden pick inserted into center comes out clean, 60 to 75 minutes. Cool in pan for 1 hour, then invert onto cake rack to cool completely. Once cooled, stick in the fridge for an hour (this makes it easier to cut). This pound cake can stand on it’s own. It is delicious!
Vanilla Bean Ice Cream w/Cookie Dough
Adapted from David Lebovitz
yield 4 cups ( you will need three cups for this recipe)
Ingredients:
1 cup whole milk
3/4 cup sugar
2 cups heavy cream
pinch of salt
1 vanilla bean, split in half, lengthwise
6 large egg whites
3/4 tsp. vanilla
Instructions:
Warm the milk, sugar, 1 cup of cream, and salt in a medium saucepan. Scrape the seeds from the vanilla bean into the warm milk and add the bean as well. Cover, remove from heat, and let steep at room temperature for 30 minutes. Pour the remaining 1 cup into a large bowl and set a mesh strainer on top.
In a separate medium bowl, whisk the egg yolks. slowly pour the warm mixture into the egg yolks, whisking constantly, then scrape the warmed egg yolks back into the saucepan. Stir the mixture, constantly, over medium heat with a heatproof spatula, scraping the bottom as you stir until the mixture thickens and coats the back of the spatula. Pour the custard through the strainer and stir it into the cream. Put the vanilla bean into the custard, add the vanilla extract and stir until cool, over an ice bath. Chill the mixture in the fridge for about 3 hours. When ready to churn, remove the vanilla bean, rinsing and reserving (I make vanilla sugar with it). Freeze the mixture in your ice cream maker according to the manufacturer’s instructions. Before transferring to a plastic container, mix in your favorite cookie dough (it is best if your cookie dough chunks have been previously frozen). Freeze in an air tight container.
Glaze
Ingredients
1/2 cup whipping cream
1/4 cup light corn syrup
6 oz. bittersweet chocolate chopped
Instructions
Bring the cream + corn syrup to a boil in a heavy saucepan. Remove from heat. Pour cream mixture over chocolate and whisk until melted and smooth. Let stand about an hour, but still pourable.
Assembly:
Cut the cake in half, lengthwise. Then cut it again. You will end up with 4 parts, all about 1″ thick. Freeze the four pieces on a sheet pan for about an hour. 15 minutes before taking the cakes out of the freezer, let ice cream rest on your kitchen counter. You want your ice cream spreadable. Line a 9″ x 9″ square baking pan with plastic wrap. Make sure there is enough overhang to wrap the cake tightly. Take two of your cake pieces and lay them on the bottom of prepared pan. Spread a little of your glaze on the surface of the cake. freeze for 15 minutes. Spread your ice cream (3 cups) over the cake. Smooth with an off set spatula.
Lay the other two pieces of cake directly over the ice cream layer. Press gently to get the cake to stick to the ice cream. Wrap the cake with the plastic wrap (the overhang of your pan). Wrap a 2nd layer of plastic wrap around the entire pan. Freeze over night. Remove the cake from the pan. Discard the plastic wrap. Cut off the uneven ends (my kids made good use of the rejected ends), creating a 7 1/2″ x 7 1/2″ square. Cut into desired size squares (I did 1 3/4″ squares). Put the squares on a wire rack set over a sheet pan. Quickly, spoon your glaze over the cake squares. Sprinkle each mini cake with nuts, jimmies, m+m’s, what ever strikes your fancy. Set in the freezer until ready to eat!
Susan Salzman writes The Urban Baker blog to explore her dedication to good food in the hope of adding beauty to the lives of her family and friends.
