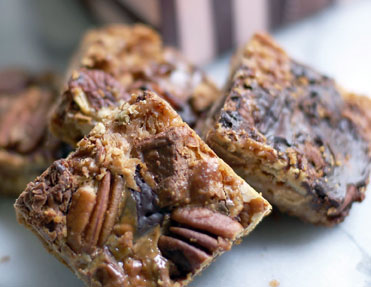
 I have been making dream bars since 1990. It is a recipe I discovered in my Rose Levy Beranbaum Rose's Christmas Cookies
 (still, one of my favorites).
Prior to making these I had made a bar similar to this one, called a “7 layer bar”. It had butterscotch chips and white chocolate chips plus other things. And they were good, but I am not a huge butterscotch fan.
When I came across this recipe I had to try them. They immediately were a hit. I make them all year round and 75% of the time you can find some hidden in the back of my freezer. They were always and still are included in my holiday baking which I have done every year since 1990.
What originally attracted me most to this recipe was the quality of the ingredients. I use only the best chocolates (white, bittersweet and milk), however I have altered the recipe a bit. I make more crust than the recipe calls for and I like to toast my pecans prior to baking. This book is worth the purchase just to have this one, very special recipe!
Dream Bars
Ingredients:
2 1/3 cups cinnamon graham cracker crumbs
12 tablespoons butter
6 oz each, white chocolate (lindt), bittersweet chocolate (valhrona) & milk chocolate (lindt, ghirardelli or drost)
3 cups pecan, toasted
1 1/3 cups shredded coconut
1 can condensed milk
Instructions:
1. Preheat oven to 350°F. Line a 10 x 15 jelly roll pan with heavy duty foil
2. Put butter on baking sheet and melt in the oven. When melted, mix in graham cracker crumbs. Spread crust evenly all bottom of the pan. Bake for 8 minutes.
4. Remove from the oven and scatter coconut on top of crust. Then layer with 2 1/4 cup of pecans, chopped fine (keep the other 3/4 cup whole). Then top with all three chocolates.
5. Evenly, pour condensed milk over chocolate and try and cover as much as possible. Top with remaining 3/4 cup whole pecans.
6. Bake for 15 minutes. Remove baking sheet from oven and with a long, metal spatula, press mixture down so all layers meet one another. Rotate the pan from back to front.
7. Bake for an additional 20-25 minutes. Check within 15 minutes to make sure the nuts on top are not burning.
8. Let cool. Once cool, stick in fridge. Let them get really cold prior to cutting. These are good right out of the oven, cold or even frozen.
Susan Salzman writes The Urban Baker blog to explore her dedication to good food in the hope of adding beauty to the lives of her family and friends.


